Navigate

What is Navigate?
A comprehensive student success management system that links administrators, faculty, staff, and advisors in a coordinated care network to support students from enrollment to graduation.


Navigate Features
If I communicate with a student through Navigate, does it go to their UNC email?
Yes, any messages you send from Navigate go to the student’s UNC email, they do not need to sign-in to the platform to retrieve the message.
If I do send a message to a student through the Navigate platform and the student replies, where does that email go?
Any replies to messages from the platform will go to your UNC email as well. It is not necessary to sign-in to the platform to retrieve replies to your messages.
Communication Policy – EAB Navigate
Navigate is not approved for Protected Health Information (PHI). Therefore, no PHI can be included in any communications.
Email Communication (Send a Message)
This section outlines how SOM faculty and staff use the “Send a Message” feature in Navigate for communicating with medical students, while remaining a good steward of information and maintaining student confidentiality and privacy. Communicating with students through Navigate is for university purposes only.
When sending a message in Navigate, the conversations between students and support staff are captured in the student’s profile and viewable on the Conversations tab.
When using the “Send a Message” feature, communications are sent to the intended students and appear in their Outlook account. Students can only respond to these communications through Outlook. Further communication from SOM faculty and staff can still occur in either Outlook or Navigate.
All communications occurring in Outlook are concurrently captured in Navigate.
Responsibility of Sender
All SOM affiliated persons who communicate with students through Navigate email agree to (i) not include PHI or Personally Identifiable Information (PII) within a message; and (ii) always use appropriate language.
Text Messaging
This section outlines how SOM faculty and staff use text messaging in Navigate for communicating with medical students, while remaining a good steward of information and maintaining student confidentiality and privacy. Texting with students through Navigate is for university purposes only.
Text messaging within the Navigate platform is limited to the following use cases:
Automated Appointment Reminders
For an appointment reminder, an automated message will be sent to the student from a short code number (i.e. 915-52).
- Reminders contain information on the type of appointment and the options selected by the student (i.e. Care Unit, Service, Location, Date and Time).
- Students cannot respond to automated text messages. If they do, they will receive a message saying it was not received.
- Students can opt-out of automated text messages. Students who opt out:
- will no longer receive automated text messages from Navigate (this only applies to messages sent from short codes).
- will not be automatically removed from standard text messages through Navigate.
- will continue to receive an appointment reminder via email.
- If a student wishes to opt-out of all text messages, they need to notify a Navigate administrator.
Personalized Text Messages
Text messages may be sent to students for academic or professional purposes to support advising and success initiatives. Text messages can be used to nudge a student to action or congratulate them on an achievement.
Our intent is to provide students with necessary information without overburdening them. Text messages should be kept to a minimum.
Text messages sent to an individual student or to groups less than 100 will be sent from a randomly generated 10-digit number (e.g. 205-619-9669).
- Students can reply for up to 90 days (the 90-day clock resets after each response)
- Student replies go to initiating staff person’s conversation tab in Navigate, and a notification email is sent to the institution email account.
- Staff can only reply to a student response through Navigate.
- Students cannot opt-out of this text setup. If a student wishes to be removed, they need to notify staff to have their mobile number removed from Navigate.
Format of Personalized Messages
Personalized text messages should be no longer than 160 characters and should include the sender’s name, so students know who the message is from. The use of abbreviations should be limited, unless they are universally used across SOM (e.g. UNC, SOM, ITS).
Examples of Personalized Text Messages to individual students:
- Hi Jay. This is your advisor, Ms. Ramsey. Registration closes 10/31/2020. Check your email for appointment scheduling instructions.
- Hello Marcus. This is the Office of Medical Research. Please schedule an appointment with us to talk about your research opportunities.
- Hi Jane, this is Amara from financial aid. Please schedule an appointment to discuss upcoming deadlines.
Example of Personalized Text Message to groups (under 100 students)
- Reminder from SOM: Graduation application deadline is December 2020.
- This is your advisor, Ms. Ramsey. Congratulations on completing another term towards your degree!
- This is your advisor, Ms. Ramsey. Registration is open. Reply here to schedule a time to meet.
Responsibility of Sender
All SOM affiliated persons who communicate with students through Navigate text messaging agree to (i) not include PHI or PII within a text message; (ii) always use appropriate language; and (iii) not specify identifying concerns related to the student’s academic or professional progress.
Calendar Syncing
This section outlines how SOM uses the Navigate calendar syncing feature, while remaining a good steward of information and maintaining student confidentiality and privacy.
This policy applies to any UNC School of Medicine affiliated person who chooses to sync their university work calendar to the Navigate platform.
Syncing calendars provides the opportunity to block out appointment times in Navigate while recognizing blocked out times in your university affiliated calendar, allowing students to view your available meeting times and schedule an appointment. The use of syncing calendars is for official university purposes only.
Use Case Example
When a student schedules an appointment through the appointment scheduler, a calendar invite is sent to all intended parties. Information in the calendar invite may include student name, student PID, organizer name, appointment type, time/date of appointment, and any open field comments entered by the student.
The university acknowledges this information is pertinent for scheduling purposes, therefore it is acceptable to have on your university affiliated work calendar. However, it is never acceptable to place student information on a personal calendar, as this concerns a student’s right to privacy and confidentiality. Under no circumstances should student information be forwarded to a personal calendar nor should anyone sync their personal calendar to the Navigate platform.
Responsibility of User
All UNC School of Medicine affiliated persons who sync their calendar agree to only sync their university affiliated calendar with Navigate.
Setting Up Availability – Online Meeting Links
This policy outlines how SOM uses Navigate online meeting links. This policy applies to any UNC School of Medicine affiliated person who chooses to input a URL when setting their meeting time availability in the Navigate platform.
Purpose
When a user sets up their availability in the Navigate platform, they have the option to include a URL for the meeting. When a student schedules a meeting, this URL becomes a clickable link for the student and will appear in their original appointment notification. Inserting a URL address into a user’s availability settings allows the user to use a persistent link, limiting the number of modifications an individual needs to make to their availability.
Responsibility of User
All UNC School of Medicine affiliated persons agree to (i) use only the Zoom platform for creating a persistent link; (ii) set up a recurring meeting rather than using their personal meeting room link; (iii) ensure they have enabled the “waiting room” feature for their recurring meeting.
Related Information
Learn more about FERPA
UNC Help & Support: UNC Policy on Information Security and UNC Help & Support: Examples of Sensitive Information
The information that you can see about a student may vary depending on your permission levels within Navigate.
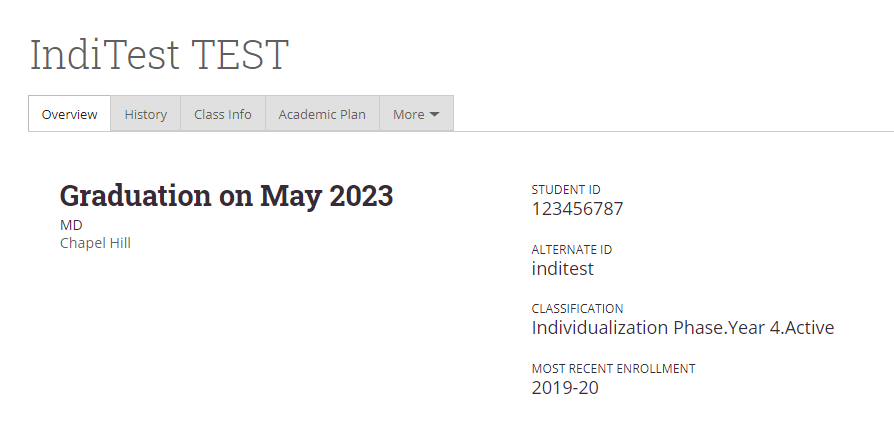
In general, you should be able to view the following on the student Overview tab:
- Name of student
- Expected graduation date
- Degree (i.e. MD, MD/MPH or MD/PhD)
- Campus Affiliation (i.e. Chapel Hill, Asheville)
- Student PID
- Alternate ID (Onyen)
- Classification (Phase of Curriculum, Number of Years in Program, Active/Inactive Status)
- Most Recent Enrollment Term
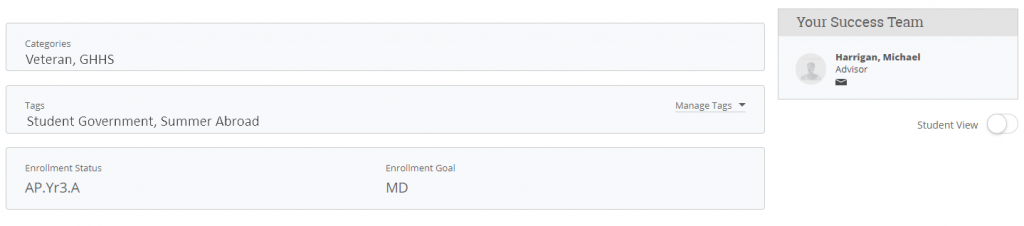
In addition, you may be able to view:
- Categories and Tags (Medical School groups in which the student is affiliated)
- Enrollment Status (i.e. AP.Yr3.A = Application Phase, 3rd year, Active Student)
- Enrollment Goal (MD, MD/MBA, MD/MPH or MD/PhD)
- “Your Success Team” (Name of Student’s Advisor)
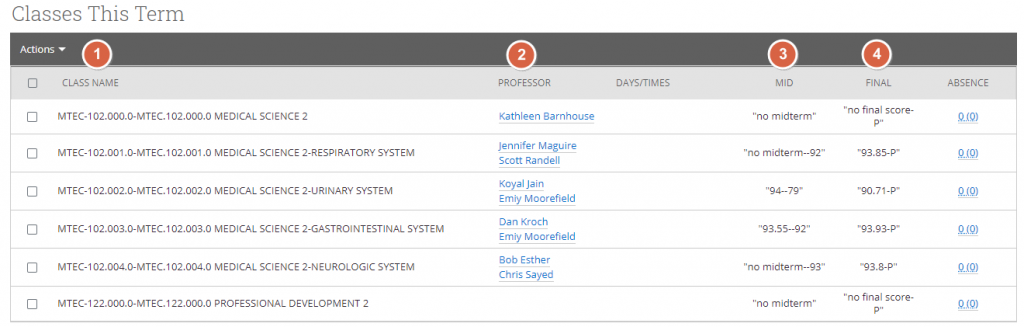
On the Class Info tab, you may be able to view:
Courses in which the student was in enrolled for a specific term (Classes This Term)
- Course Name and Course Code – All blocks within a course are listed on their own line and report the following information:
- Professor (Name of block or course director)
- MID (Midterm score — final exam score)
- FINAL (Final block score — block grade)
Courses in which the student was in enrolled for a each term (Term Details)
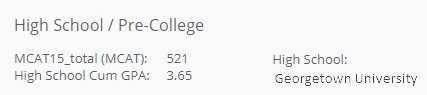
Term Details gives an overview of each semester the student has been enrolled, along with STEP scores and MCAT scores.
Hovering over a specific class can provide the given information in a line-by-line format, but ultimately is a quick overview before getting into Classes This Term.
- Course listing by term
- Final Course or Block score – grade
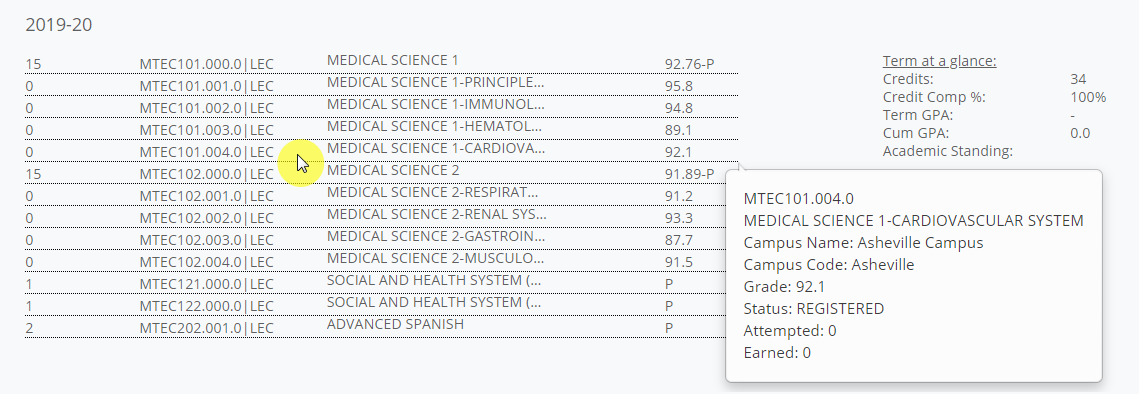
- MCAT scores
- Note: Undergraduate Institution is displayed under “High School”
Strategic Care (Staff, Faculty and Advisor Dashboard)
- Appointment scheduling – Streamline scheduling, including reminder emails and text messages.
- Appointment Campaigns – Send targeted communications to students and track the number of students who schedule appointments.
- Alerts – Send message to students (ie., events, congratulatory remarks, etc.)
- Advanced Search that allows users to obtain actionable information quickly and easily about targeted groups of students.
- View student profile, including academic and demographic information.
Benefits
- Improves communication and follow up between students and care units within the medical school, which provides seamless interactions and promotes increased accountability.
- Improves communication and follow up between staff, faculty, and advisors, by viewing interactions students have had with various care units. Allows for proactive, coordinated support to refer students toward resources necessary for success.
Smart Guidance (Student Dashboard)
The student dashboard, or Smart Guidance app, is different from the Strategic Care dashboard that staff, faculty, and advisors are using. Students have the ability to do the following:
- Schedule appointments with advisors, tutors, and other medical school support staff.
- View their class schedule
- View university events
- Receive appointment reminders
- View student holds and financial aid information
- Access on a mobile app or desktop application

- Select the Calendar icon from the left navigation panel.
- Select Settings and Sync on the far-right side of the screen.
- Select Setup Sync.
- Select Office 365 (Latest Version) from the list of calendar application options. You will be prompted to select your ONYEN@ad.unc.edu account from the Choose an Account page. Click Allow to grant access to your Outlook Calendar. Accept Permissions.
- You are now done syncing your calendar. It may take a few minutes to fully sync.
- You can confirm the sync is complete by going back to your EAB-Navigate Calendar from the left navigation panel. Your student appointments will display with a green tab on the left side. Your UNC calendar appointments will show as “Busy” with a purple tab on the left side.
As a new user, the first thing you need to do is set up availability in Navigate so that students can schedule appointments to see you. It is important to note that locations and services are created by the School of Medicine application administrators.
Add Time
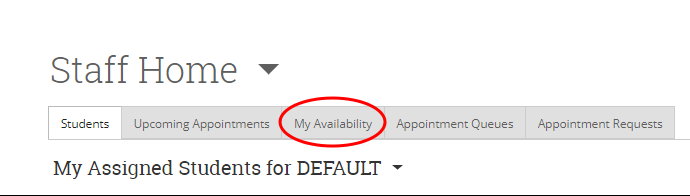
Step 1: From the “Advisor Home” select the “My Availability” tab.
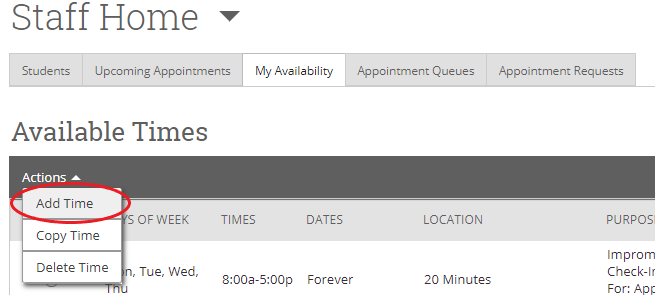
Step 2: Use the “Actions” drop down menu located under the “Times Available” headline and select the “Add Time” option.
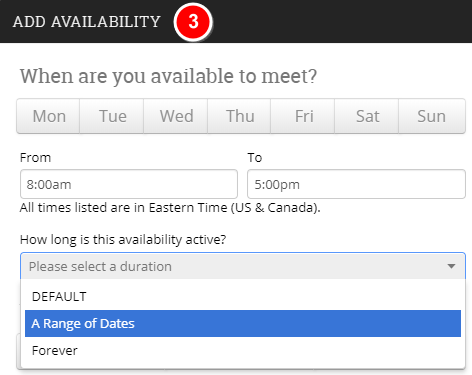
Step 3: Select the Day(s) and times you are available to meet with students. If your availability varies from week to week, select the date range that applies for the selected days and times.
Step 4: Select whether you will meet with students via appointments or drop-ins during that time. The campaign option is reserved specifically as dedicated time for targeted students to make appointments with you.
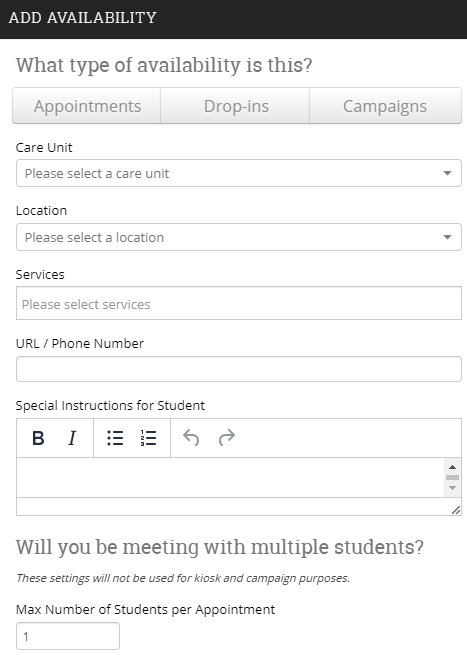
Step 5: Select your Care Unit.
Step 6: Select your Location.
Step 7: Select your appointment reasons (Services). You can add more than one. If setting up campaigns, the “service” you select here must match the “service” you select when creating the campaign.
Step 8 (special instructions): Please include information you want to share with your students, including what they may want to have prepared for the meeting. This information will be emailed to students in appointment confirmation & reminder emails.
Step 9: Select maximum number of students per appointment.
Step 10: Click save. See below for an example of appointment availability. You can click “Copy Time” under actions and edit the details to save time when adding additional times. Depending on whether you selected a date range or a semester as your availability expiration, please remember to update your availability accordingly.

There are four other options when adding Times Available.
Copy Time – to copy a time, select the time you would like to copy and then click the Copy Time button. The availabilities will be copied, and a dialog will open allowing you to make edits or to save your newly created availability.
Delete Time– to delete your time, simply select the time and click the Delete Time button.
Add to Personal Link – Select the time you would like to add to your personal link and then click the Add to Personal Link.
Remove from Personal Link – Select the time you would like to remove from your personal link and then click the Remove from Personal Link
Note: Inactive availability are highlighted in red in the Times Available grid.

Use your Personal Availability Link to share specific available times with students. Once your available times have been added to the personal availability link, students can have direct access to your specified availability.
General Questions for Faculty, Staff and Advisors
Appointment Campaigns enable staff and advisors to send communications to targeted students, allowing them to select a specific date and time in which to schedule an appointment.
Select the Campaigns icon from the left navigation panel.
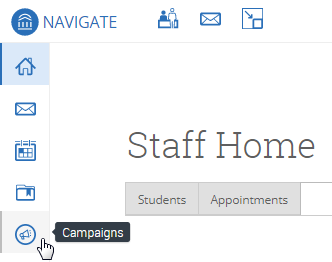
This will take you to the Campaigns tab. From there, select Appointment Campaigns.
Define Campaign:
- Name your campaign (Students will not see the name of the campaign)
- Select “Advising” as the Campaign Type
- Select 1 slot per time
- Under “Select Course or Reason”, choose the services for which you are available. NOTE: This must match the availability you have set up on your advisor home page, under “My Availability”. In that screen, you must have selected matching appointment reasons. For example, if in your advising campaign you say you will be available for “Registration”, you must also have chosen “Registration” as a service you are available for in your campaign appointment availability.
- Begin Date and End Date- choose the date range for which you want the campaign to run. If a student tries to schedule outside of that time, they will receive a message stating that the campaign has expired. NOTE: This must match the availability you have set up on your advisor home page, under “My Availability”. Ensure that you have created CAMPAIGN availability (as opposed to appointment or drop in availability) during the timeframe that you would like your campaign to run.
- Appointment Length- how long do you want the appointment to last?
- Appointment Limit- how many appointments can the student schedule for the campaign? (default is 1)
- Location- Choose your location. NOTE: Ensure that for the campaign availability you have created under “My Availability” you have selected that you will be available in the same location.
Adding Students: Use the advanced search feature to search for students you would like to participate in the campaign. Or, choose one of your saved searches by clicking the drop-down arrow beside “Saved Searches”. If you want to ensure that you only return a list of students assigned to you, also click the box beside “My Students Only” next to the Search button. Select the students you wish to include in your campaign. Confirm the list of students included and remove or add students as needed.
Adding Staff: If you have correctly set up your availability for Campaigns then you should see your name on the next page under “Add Advisors to Campaign”. If applicable, select other advisors to join your campaign.
Compose Your Message:
- Create a Subject Line for your email
- In the next box, edit the text for the email.
- NOTE: Always be sure to keep the Schedule Link in your email body, if that is removed students will be unable to schedule appointments.
- In the instructions and notes box, add any details about the appointment that you would like to display on the scheduling landing page.
- As you edit these fields, the text in the box below will show how your edits will appear in the message.
- Scroll down to the bottom of the screen. On the left tab, you will see a snapshot of what the email the student receives will look like.
- On the right tab, you will see the scheduling landing page. This is where the student will be directed to choose a time for their appointment when they click the link in their email.
Confirm & Send: Review the details of your campaign. When you are ready, click send to issue the email to students on the list.
- To cancel an appointment, click on the “Upcoming Appointments” tab.
- Select the box next to the appointment that you want to cancel.
- Under “Actions”, click on the “Cancel Appointment” option.
Students can schedule appointments through the web-based platform or Smart Guidance App. On the web-based platform, students will select the blue Schedule an Appointment button. Within the Guide App, they will select the Appointments tab. Both options will walk students through a workflow of questions to assist them with scheduling appointments with the correct faculty or staff member.
Sometimes, the availability that an advisor has designated does not align with the student’s availability. For example, if a student has classes scheduled during the advisor’s available time, the calendar will not show any available appointments.
Students will primarily use Navigate through an app on their phone or iPad but will also be able to log in on a desktop application. Staff, faculty, and advisors will login through a desktop application. Everyone granted access will log in to using their Onyen (single sign-on) credentials.
Advanced Search allows users to obtain actionable information quickly and easily about targeted groups of students.
The following table provides terms and definitions of all searchable fields.
| Term | Description |
|
Student Information |
|
| First Name | Student First Name |
| Last Name | Student Last Name |
| From Last Name | The beginning of a range of last names. This includes the name typed in. |
| To Last Name | The end of a range of last names. This includes the name typed in. |
| Student ID | Student PID |
| Student List (In Any of These) | A previously made Student List can be used for the search function. Refer to “Can I Save a Search” on the Navigate webpage. |
| E-mail(s) | Student’s email(s) |
| Category (In Any of These) | Used to group students by various UNC SOM demographic associations. Includes: Phase, LOA type, Scholar type, Campus location, Cohort, Transfer type, Veteran, Resident status, Military status, Advisory college, Holds, Decels, and Programs and Honors Societies. |
| Tag (In Any of These) | Used to group students by various UNC SOM associations. Includes: PCC Tutors, Scholarly Concentration, Student Government, and Summer Abroad. |
|
Enrollment History |
|
| Enrollment Terms (In Any of These) | Year of Enrollment, STEP Scores |
|
Area of Study |
|
| College/School (In Any of These) | Campus Location |
| Major (In Any of These) | Graduation Date |
| Major (In All of These) | Graduation Date |
| Major (In None of These) | Graduation Date |
| Degree (In Any of These) | Possible degree combinations |
|
Term Data |
|
| Term | Year term |
| Min. Credit Hours | Minimum credit hour(s) a student is enrolled in in a term. |
| Max. Credit Hours | Maximum credit hour(s) a student is enrolled in in a term. |
|
Performance Data |
|
| Min. High-School GPA | Undergraduate GPA minimum |
| Max. High-School GPA | Undergraduate GPA maximum |
| Min. Credits Earned | Undergraduate Credits Earned minimum |
| Max. Credits Earned | Undergraduate Credits Earned maximum |
| Min. Hours Attempted | Undergraduate Hours Attempted minimum |
| Max. Hours Attempted | Undergraduate Hours Attempted maximum |
| Min. Credit Comp. % | Undergraduate Credit Completion Percentage minimum |
| Max. Credit Comp. % | Undergraduate Credit Completion Percentage maximum |
|
Course Data |
|
| From Term | The beginning of a range of term years. Includes year selected. |
| To Term | The end of a range of term years. Includes year selected. |
| Course | Course name for given term ranges. |
| Add More Courses | Creates another search using From Term, To Term, and Course. |
|
Assigned To |
|
| Student Has Relationship | Role of the Relation to student. Potential relations include: Advisor and Support Staff. |
| Staff | Staff members that fit the role selected first. Can elect for “No Assigned __” in the search. |
| More Assignments | Creates another search using Student Has Relationship and Staff. |
|
Non-Searchable Terms |
|
| Alternate ID | ONYEN |
| Classification | Program Year, and Status (Active or Inactive) |
| Enrollment Status | Class code |
| Enrollment Goal | Degree combination goal |
| Care Units | The different support services and offices offered through UNC SOM. Care units can use categories and tags to track or communicate with a subset of the student population. Includes: Career Goal Advising, Financial Aid, Office of Academic Excellence and Support, Office of Global Health Education, Office of Medical Student Research, Office of Scholastic Enrichment and Equity, Registrar/Student Affairs, and Rural Initiatives. |
Saved Search
Saved searches allow users to conduct a pre-configured advanced search. Additionally, saved searches dynamically regenerate a list of students or users based on the search criteria. They can be helpful for users who frequently run the same search at different points in the term, as it allows you to maintain consistency with your search parameters.
Student List
A Student List is a static list of students by student ID. You can use Student Lists in a variety of ways, from maintaining a list of students to track over time, to sending messages or appointment campaigns directly from the Student List.
All users within Navigate will be added to a School of Medicine listserv. This listserv will be used to communicate with Navigate users when the application is experiencing technical problems, updates are scheduled, or general information needs to be shared.
If you are a Navigate system user, but are not receiving these updates, please Submit a Service Now Request.
If you have questions, or would like to schedule a training, please submit your request through Service Now.
Data and the Navigate Site
EAB updates Navigate nightly, so any changes in one45 and the SIS are reflected the next day.
On the Class Info tab, you may be able to view:
Courses in which the student was in enrolled for a specific term (Classes This Term)
- Course Name and Course Code – All blocks within a course are listed on their own line and report the following information:
- Professor (Name of block or course director)
- MID (Midterm score — final exam score)
- FINAL (Final block score — block grade)
Courses in which the student was in enrolled for a each term (Term Details)
Term Details gives an overview of each semester the student has been enrolled, along with STEP scores and MCAT scores.
Hovering over a specific class can provide the given information in a line-by-line format, but ultimately is a quick overview before getting into Classes This Term.
- Course listing by term
- Final Course or Block score – grade
- MCAT scores
- Note: Undergraduate Institution is displayed under “High School”
A category is a group of students that care units may wish to track or communicate with; students may belong to several different categories. The full list of categories can be found under “How do I do an advanced search?” in the above section.
Data issues should be reported by submitting a Service Now ticket. An example of a data issue could be a student you know is on LOA, but Navigate does not show they are included in this category, or any other discrepancy between what you know to be true and what you see displayed in Navigate.
No. The student dashboard does not display grades.
Yes. All student information in Navigate is part of the student educational record and subject to FERPA.
Remember – Any information you enter into the platform pertaining to a student becomes a part of their official student record and may be subpoenaed by that student, as outlined in the Family Educational Rights and Privacy Act (FERPA).
Roles and Permissions
Roles and permissions, which vary amongst users of the Navigate system and are determined by the EAB-Navigate leadership team.
To access Navigate, have your supervisor complete this systems request form.
Active Student Indicator
The active indicator will include any student with admitted status, including students on LOA.
Students will become inactive in the Navigate system when they graduate from the School of Medicine, have been dismissed or have withdrawn from the program.
From your home page (scroll down), you will see your recent appointments. Select the appointment you would like to report. Select actions > add appointment summary. It will auto populate some of the details from the scheduled appointment; however, you should verify the arrival and departure time on the left-hand side.
Yes. Open the appointment summary you would like to edit. The option to “Edit Report” can be found in the bottom right-hand corner.