Publishing States
WordPress uses publishing states to manage whether content is public, private, or still in progress. This page explains what each option does, when to use it, and how it affects the visibility of site content.
Although pages are what is used in the examples, the publishing states also apply to other content types such as News Posts, Events, Directory Profiles, and more.
Covered In This Tutorial
- Publishing panel overview
- Publishing states
- Unpublishing content
- Preview
- Visibility
- Scheduling content
Publishing Panel Overview
 The publishing options can be found in the Publish panel.
- Save Draft — Save changes without publishing.
- Preview — Opens a preview in a new tab to let you see what the finished page will look like before saving changes.
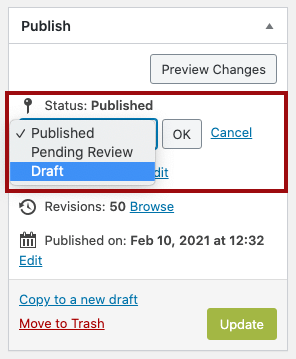
- Status — Shows current state (Draft or Published).
- Visibility — Controls who can see the content (everyone, only people with a password, or only site editors/admins).
- Publish Immediately — Controls when the page goes live (now or at a scheduled time).
- Publish / Update — Makes the page visible to the public and saves any changes.
Publishing States
WordPress provides a couple of states for content: Draft, Pending Review, and Published.
Draft
Draft content is material you’re still working on and haven’t yet made public.
- Who can see it? Only logged-in site editors.
- When to use it: When the content is incomplete, awaiting review, or not ready for public view.
- Drafts are not accessible to site visitors or search engines.
- When editing a Draft page, click the Save Draft button to save your changes and leave the page in Draft mode.
How to Find Drafts
If you previously saved a page as a Draft and want to return to it:
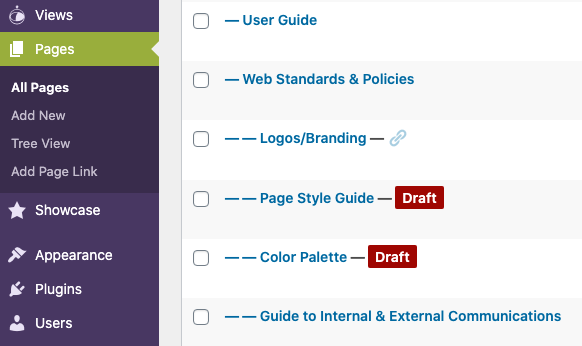
- Select Pages in the Dashboard.
- Draft pages are labeled with a red “Draft” tag next to the title.
- Click the page title to open it for editing.
This same approach works for other content types:
- To edit a draft News Post, select Posts in the Dashboard then find the post you wish to edit.
- To edit a draft Event, select Events in the Dashboard then find the event you wish to edit.
Pending Review
Pending Review is used by site editors with the Contributor role. These editors can create content but they cannot publish it. Site editors with publishing permissions will need to review this content. They can either Publish it or set the status back to Draft if they don’t think it’s ready for publication.
- Who can see it? Only logged-in site editors.
- When to use it: Use Pending Review when the content is complete and ready for someone else to approve.
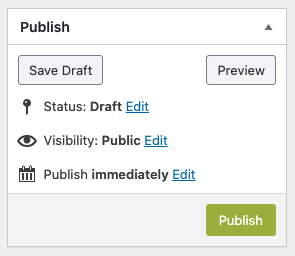
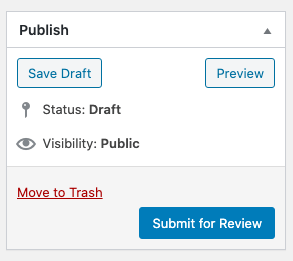
Save Draft vs. Submit for Review
When a Contributor creates a page, they have two options:
- Save Draft means “I’m still working on this Post. It’s not yet ready to publish.”
- Pending Review means “I think this Post is ready to be published. I need someone to review and publish it.”
This image shows the options a Contributor has when saving a page:
How to Find Content That is Pending Review
If a Contributor submits an item for review, an Administrator or Editor can moderate the post.
- Select Pages (or Posts, Events, Profiles, etc.) in the Dashboard.
- Items awaiting review display a blue “Pending” label next to the title.
- Click the title to open and review the content.
- Optional shortcut: click the Pending filter link at the top of the list to show only Pending items.

Published
Published content is live and publicly visible on your website.
- Who can see it? Anyone visiting your site, as well as search engines (unless the content is Password Protected – explained below).
- When to use it: When the page is complete and ready to go live.
- Once a page is published:
- It can appear in navigation if it has been assigned a parent or added to menus.
- It can be assigned children pages.
- It can be found in site searches and indexed by search engines.
- Other pages can link to it.
- Once a page is published, the Publish button changes to Update. Use the Update button to save changes to a published page.
Unpublishing Content
If you have outdated or incorrect content that you no longer want visitors to see, you can either delete or unpublish it. To unpublish a page, simply change its status from Published back to Draft.
- Changing the status to Draft removes the page from public view without deleting it. The page remains available for editing.
- Delete the page – use this only when the content is no longer needed.
Important: Deleting or unpublishing pages can create broken links if other pages point to them. Review your site and fix any affected links.
Preview
Preview lets you see how your page will look without affecting the live site.
- Who can see it? Only you (and other site editors).
- When to use it: When you want to check layout, formatting, or content on a draft page or before saving changes to a published page.
Visibility
Visibility settings control who can see a page once it is published.
Public (Default Setting)
The page is live and visible to anyone visiting your site including search engines.
Password Protected
The page is published, but visitors must enter a password to view it.
Who can see it:
- Anyone who has the password.
- Search engines will not index the content.
How it works:
- You set a single password. Anyone who has the password can access the page. There are no individual user accounts or permissions.
- No sensitive information, including PHI, is allowed in a School of Medicine WordPress website.
- Setting the Visibility to Password Protected will automatically change the Status to Published.
- Site visitors will see the Title of the password protected page and will be prompted to log in before they are shown more.
- Password protection applies to the page text only. Any media files (images or documents) on the page remain publicly accessible to anyone with the direct URL, can appear in site searches and can be indexed by search engines.
- Sharing a single password with multiple people is not a recommended method to restrict access to documents or content that should not be publicly available.
- Alternative ways to protect non-public content include using SharePoint or OneDrive. Access can then be controlled through permissions.
Private
Sometimes you need content to exist on the site but not be visible to site visitors. The Private state lets you publish a page while restricting access to only Editors and Administrators. This is different from a Draft, which is not published and cannot be viewed on the front end at all.
Private
- A Private page is published but restricted.
- Only editors and administrators can view it.
- Does NOT appear in menus or search results for regular visitors.
- Completely hidden from public users and search engines.
- Think of Private as “Published, but internal-only.”
Draft
- A Draft page is considered unfinished.
- Visible only to logged-in editors and administrators.
- Not published.
- Not indexed by search engines.
- Intended for content still being created or reviewed.
- Think of Draft as “Not ready yet.”
Scheduling Content
By default, pages go live as soon as you publish them. If needed, you can schedule them to publish at a future date and time.
This is helpful when planning launches, announcements, and time-sensitive updates. For example, if a program launches Monday at 8:00 AM, you can schedule the page in advance rather than publishing it manually at that exact time.
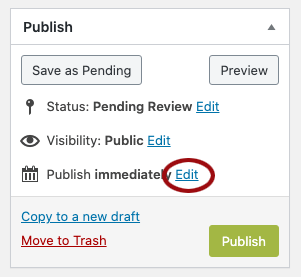
How To Schedule
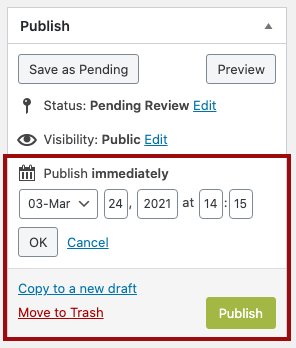
- In the Publish box, select the Edit link located to the right of Publish immediately.
- Select the future date and time you want the page to go live.
- Click OK to confirm the date/time.
- Click Publish to save the schedule. You must select Publish for the page to be published at the desired date and time!
- The page will remain unpublished until the specified date and time – at which point WordPress will automatically publish it.