Links
Links are one of the core building blocks of the web. They connect visitors to related pages, documents, and external resources. This page explains how to create, edit, and format links while following accessibility and SEO best practices.
If you’re looking for instructions on adding links to your site’s main or left-hand navigation, visit the Navigation documentation.
Covered In This Tutorial
- Video Demonstration
- Best Practices
- Creating Standard Links
- Creating Email Links
- Creating Document Links
- Meaningful Link Text
- Edit a Link
- Remove a Link
- Anchors (“Jump Links”)
- Opening Links in New Tabs or Windows
- Linked Images
- What Links Sound Like to Screen Readers
- Resources and Guidelines
Video Demonstration
The video below demonstrates how to add links within the content of pages, news posts, events, and more.
Best Practices
- Accessibility is required. All links should have clear, descriptive text that tells users what to expect.
- SEO benefit: Descriptive link text helps search engines understand your content.
- Style consistency: The SOM theme automatically styles links for accessibility and brand compliance; there’s no need to customize colors or underlines.
- Do not style regular text to look like a link. For example, avoid underlining or coloring text blue. This can confuse visitors.
Creating Standard Links
Email links and document links (Word Docs., PDF, etc.) each have their own unique method which are explained below.
Option 1: Copy and Paste a URL (Quickest Method)
- In a separate browser window, go to the web page that you want to create a link to.
- In the browser’s address bar, copy the url of the page.
- Go to the web page you wish to add a link to.
- Type out some descriptive link text.
- Highlight the text.
- Paste it directly onto the highlighted text (Ctrl + V on Windows or Cmd + V on Mac).
- WordPress will automatically create a link.
Option 2: Use the Link Icon and Paste a URL
- Go to the web page you wish to add a link to.
- Type out some descriptive link text.
- Highlight the text.
- Click the Insert/Edit Link icon
 in the toolbar.
 - In the popup field, paste or type your full URL.
- Click Apply (the arrow icon) or Enter on your keyboard to create the link.
Option 3: Use the Link Icon and Search for Internal Content
This method helps you link to pages, news posts, events, or profiles already on your site without needing to copy the URL.
- Go to the web page where you wish to create a link.
- Type out some descriptive link text.
- Highlight the text.
- In the editor, click the Insert/Edit Link button .
- In the popup box that appears, type a few keywords from the page title or body content of the page you want to link to.
- A dropdown list of matching internal content will appear.
- Select the correct item, then click Apply or Enter on your keyboard to create the link.
Creating Email Links
In HTML, email links use the prefix “mailto:” to tell browsers to open a user’s default email program instead of navigating to a webpage. When your link text is an email address (for example, webhelp@med.unc.edu), the SOM web system automatically adds “mailto:” for you. If the link text is not an email address (for example, Email the Web Team), you’ll need to manually add “mailto:” followed by the address.
Option 1: When the Link Text Is the Email Address
If the link text is an email address, such as someone@med.unc.edu, the system automatically adds the “mailto:” prefix in the link bar.
- Go to the web page where you wish to create a link.
- Type the full email address (for example, someone@med.unc.edu) in the page where you want the link.
- Highlight the text.
- Click the Insert/Edit Link icon .
- In the URL field, type mailto: followed by the same email address. There should be no spaces in the link.
- For example: mailto:someone@med.unc.edu
- Click Apply (the arrow icon) or Enter on your keyboard to create the link.
Option 2: When the Link Text Is Not the Email Address
If the link text is descriptive (for example, Email the Web Team), you’ll need to manually add “mailto:” in the URL field.
- Go to the web page where you wish to create a link.
- Type out some descriptive link text.
- Highlight the text.
- In the editor, click the Insert/Edit Link button .
- In the URL field, type mailto: immediately followed by the email address. For example mailto:someone@med.unc.edu.
- Click Apply (the arrow icon) or Enter on your keyboard to create the link.
Creating Document Links
Documents (PDFs, Word Document, PowerPoints) require a slightly different process. See the Documents documentation for detailed steps on uploading and linking to these files.
Meaningful Link Text
Accessible, descriptive link text improves both user experience and SEO. Link text should clearly describe the purpose or destination of the link. Users should know exactly what will happen when they click it.
Screen readers often present a list of all links on a page without surrounding context, so link text must make sense on its own.
Don’t
- Don’t use vague phrases like “Click here,” “Learn More,” or “Read more.”
- Don’t use full URLs as link text – screen readers will read every character.
- Incorrect: https://www.med.unc.edu/urology/residency/
- Correct: Urology Residency Program
- Don’t use multiple links that all say the same thing but go to different places.
Example
Let’s say you work Roper Hall, and you want to help visitors find your location. You might add a sentence like “Directions to our Roper Hall location.”
If you make only “Roper Hall” the link text, that’s not descriptive enough. “Roper Hall” could link to Google Maps, a parking map, or even an article about the construction of Roper Hall (like the MD Curriculum’s Roper Hall page).
A better choice is to make the entire phrase “Directions to our Roper Hall location” the link text. This gives users (and screen readers) the full context of what to expect when they click.
Edit a Link
- Click once on the linked text.
- Select the Edit Link (pencil) icon.

- Update the URL or search for a new page.
- Alternatively, click the Link Options (cog wheel) icon to edit both the link and the link text.
- Click Apply (the arrow icon) or Enter on your keyboard to save the changes.
Remove a Link
- Click once on the linked text.
- Click the Remove Link (broken chain) icon.

Anchors (“Jump Links”)
Anchors let you link to a particular section within a page. They’re especially helpful for long pages with multiple sections or tables of contents.
Create an Anchor
- Place your cursor where you want to link to.
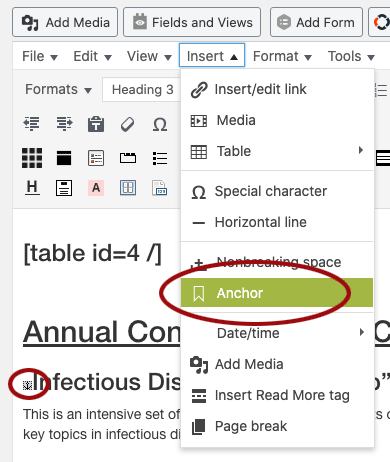
- Click Insert → Anchor from the toolbar.
- When the anchor text box appears, enter a unique word or phrase that describes the link’s destination. Use only lowercase letters, numbers, hyphens, or underscores. Do not include spaces.
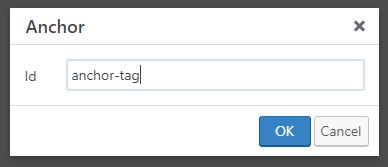
- Select the Ok button to create the anchor.
Link to an Anchor on the Same Page
- Highlight your link text.
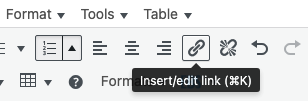
- Click the Insert/edit link icon in the editor (You can also use Ctrl+K/ ⌘+K).
- In the URL field, type # followed by the anchor name (e.g. #anchor-tag or #top-of-page).
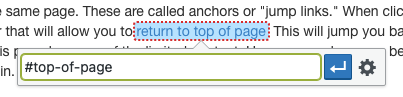
- Click the Apply button or Enter on your keyboard to create the link.
Link to an Anchor on Another Page
Add the URL of the page, followed by # and the anchor name. For example: https://www.med.unc.edu/webguide/userguide/getting-started/links#top-of-page.
Opening Links in New Tabs or Windows
Opening links in new tabs or windows is not recommended. Both the SOM Web Team and the World Wide Web Consortium (W3C) discourage this practice because it removes control from the user and can be confusing for people using screen readers or those with cognitive disabilities.
Visitors can always choose to open links in a new tab or window themselves (for example, by right-clicking a link and selecting “Open Link in New Tab”).
If you must open a link in a new tab, always warn users in advance by including text such as “(opens in a new tab)” in the link.
Why It’s a Problem
- It creates unexpected behavior and breaks the browser’s back-button history.
- It can disorient screen reader users and those with cognitive impairments.
- It removes user choice and control.
Linked Images
When an image functions as a link, its alt text becomes the link text for screen readers. The alt text must describe both the image’s context and the purpose of the link so that users understand what clicking the image will do.
Example 1 – Faculty Profile
- Alt text: “Dr. Lisa Smith, view her faculty profile.”
- Describes who is shown in the image and where the link leads.
Example 2 – Campus Location
- Alt text: “Directions to our Roper Hall location.”
- Explains the image and identifies the destination.
Example 3 – Event Promotion
- Alt text: “2025 White Coat Ceremony, view event details.”
- Identifies the event and clarifies the link’s purpose.
If a linked image has no alt text, a screen reader will read the image file name, such as “IMG_1234.jpg,” which is not accessible and should be avoided.
What Links Sound Like to Screen Readers
Why Use Descriptive Links
How To Write Accessible Links
Resources and Guidelines
- Accessible Link Text (Penn State) – Shows examples of both accessible and inaccessible link text, with clear explanations of what makes link text meaningful.
- WCAG 2.2 – Success Criterion 2.4.4: Link Purpose (In Context) – The purpose of each link should be clear from the link text alone or together with its surrounding context, unless the purpose would be ambiguous to all users.
- WCAG Technique G200: Opening New Windows and Tabs from a Link Only When Necessary – This guideline discourages automatically opening links in new windows or tabs. Doing so can be confusing or disorienting for users, especially those using assistive technologies.
- WebAIM: Links and Hypertext – A helpful overview of how to create accessible links and why descriptive, well-structured link text matters for all users.